The year: 2007. The place: Tucson, Arizona. It was my first IAEI Section meeting. The education program was “Causes of Electrical Fires.” I did not know which causes would be mentioned in the class, but I knew that if loose connections were not included, I would have to bring up this topic. As expected, by the end of the training session, torquing had not been discussed. Nervously, I walked to the microphone ready to face ridicule, but knowing how important it was not to miss this opportunity. When I explained that improper torquing was yet another cause of electrical fires and that my employer, Palo Alto, California, had been verifying torque for the past few years, as expected, there was laughter by several attendees. Maybe this response was prompted by a lack of knowledge or comprehension of the importance of proper torquing. The response received on that day is, and no doubt will continue to be, repeated during electrical inspections. Do not let this response deter you from providing information. You don’t have to be the instructor of a class or seminar to be an educator.
After the presentation on the “Causes of Electrical Fires” was over, one of the equipment manufacturers came up to me, wanting to discuss torquing. He was glad that I had brought up the subject, and he explained that connections sometimes vibrate loose during transport and that this situation is not verified in the field. He also noted that customer complaints related to loose connections are not uncommon. As you can see, torquing is an issue, but it may not be talked about as often as necessary.
My goal for this article is to answer some commonly asked questions, to address misconceptions, and to show that torquing the connections is perfectly natural. The practice may not seem natural at first, but this crucial part of an electrical installation is not to be ignored.
Loose connections cause fires
Loose connections may operate satisfactorily for a time, but eventually they will experience thermal runaway that will result in extremely high temperatures causing equipment damage and, in some cases, structural fires. I have seen several instances of failures and fires that were confirmed to be caused by loose connections.
For many electricians, the idea of torquing terminations is a new concept, but the benefits are clear: safer installations. Torquing is not new; in fact, automobile mechanics have been using torque tools for almost as long as they have been making cars. A quick search of Wikipedia reveals the following history: “A torque wrench is a tool used to apply a specific torque precisely to a fastener such as a nut or bolt. It is usually in the form of a socket wrench with special internal mechanisms. It was invented by Conrad Bahr in 1918 while working for the New York City Water Department. It was designed to prevent overtightening bolts on water main and steam pipe repairs underground.”
There are likely electricians who have never seen a torque screwdriver or even know that these tools exist; some will not know where to purchase the tools. As electrical industry professionals, we need to be ready to provide information if the circumstance calls for it.
Why torque?
Besides installing equipment according to the listing and labeling requirements as required by NEC 110.3(B), there are several reasons connections should be torqued. In a time when being “Green” is all the rage, what better way to “be green.” Loss of energy can be prevented when connections are tight. After all, property owners may be paying premium prices and would want the benefit of each electron instead of losing energy that is dissipated at loose connections.
Fire prevention is another great reason to torque connections. When the conductors are not making good contact, this can create arcing, sparking and overheating, with the result being a fire.
When torquing, not only are we looking for loose connections but there may be some connections that are over tightened and now stripped. A stripped connection is not always evident by visual inspection only. You may notice a skewed setscrew or damaged setscrew on a mechanical lug, which could indicate a stripped connection. When breakers are stripped, there may be no obvious visual sign.
Both loose and overly tightened connections create a risk of failure. Neither equipment manufacturers nor industry standards recommend periodic retightening of connections. Even when a “hot” connection is detected during an infrared inspection, simply tightening the connection probably will not correct the deficiency.1 The connection must be disassembled, cleaned and reassembled with the proper tool and torque. Additionally, cutting off the previously connected end of the wire and making the connection with an unused section of wire is the safest solution.
What tools are needed?
When the inspector arrives at a job site for a panel inspection, one of the first things that should be asked of the electrician is “Where are your torque tools?” Common responses to this question are, “I have been doing this for thirty years” or “No one has ever asked me to do this.” These responses usually come from electricians who do not use or do not own a torque wrench or torque screwdriver. Often when I ask to see the torque wrench and torque screwdriver that was used, an Allen wrench set is what materializes. The Allen wrench seems to be the tool of choice, but this is not the right tool to complete the job. Can you really torque by feel? Can you calibrate your arm? My guess is that if someone has used a torque wrench for years, they may come pretty close, but is “close” good enough? Research2 has shown that only about 25% of connections performed without a torque wrench are within +/- 20% of the manufacturer’s recommended torque value. That means 75% of the connections are wrong! Do you feel good about doing a good job 25% of the time?
Having the right tools for the job is a good place to start; otherwise, you may be setting yourself up for failure. To start with, every electrician must have a torque wrench. An inch-pound torque wrench will be required, and depending on the job, a foot-pound torque wrench may be required. You will also need a torque screwdriver, square drive and slotted bits, Hex socket set (both standard and deep socket), and a pair of tongue-and-groove pliers (commonly known as “channellocks”). For a residential 200-amp service panel, a foot-pound torque wrench may not be required. The highest torque value for a 200-amp service panel usually is around 250 inch-pounds. These connections are for the service-entrance conductor (SEC) terminations with an Allen set screw termination. A foot-pound torque wrench will have the higher ranges needed to achieve values higher than 250 inch-pounds and will be required for service equipment over 200 amps.
The torque screwdriver is used for the circuit breaker and ground/neutral bus terminations. Smaller service equipment, such as 100 amps with smaller service-entrance conductors, will likely terminate at a smaller mechanical lug with a slotted setscrew. A good rule of thumb to keep in mind is that the torque value for a slotted setscrew is not over 50 inch-pounds.

The hex socket set will be used for the Allen setscrew found at service-entrance mechanical lugs, and at larger breakers typically found in commercial switchgear and panelboards. This is where your deep socket hex set will come into play. The setscrew on these larger breakers is set back within the breaker some three inches and the standard hex socket will not fit even with an extension. The openings to access these recessed terminations are very minimal.
Channellocks or similar pliers must be used to back up or hold mechanical lugs in place while the proper torque is being applied. The means by which the mechanical lug has been attached to the equipment may not have been tested to withstand the same torque as the lug and, therefore, must be securely held in order to avoid damaging the equipment.
Damaged equipment imposes additional costs and time delays that could have been prevented. It is fairly common to see factory-installed mechanical lugs attached to the ground/neutral bar. These lugs are located either at the top or the bottom of the bar. If securing the lug while torquing is not taken into consideration, it is likely that the bus will split. Each bar has multiple holes for the equipment ground and/or neutral conductors to terminate. If you notice that the bar is starting to bend while torquing, a better hold of the mechanical lug is required, or you will have damaged equipment to replace.
Have you ever heard the phrase “torque seal” used and wondered what it is? Torque seal is used by manufacturers at the factory and by electricians for field connections. Torque seal is a stripe of lacquer applied to a bolt/nut/set screw after torque has been applied. It is usually packaged in poly squeeze tubes and is available in an array of colors. Torque seal is a good method to confirm which connections have already been torqued. Note: torque seal is not a substitute for using the right tool! It should only be applied after tightening the connection to the proper value.
What is a torque wrench and torque screwdriver?
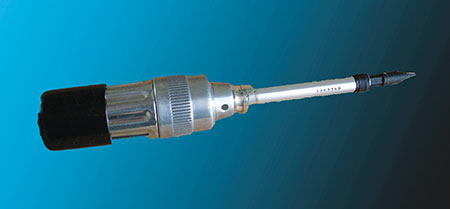
A torque screwdriver is not a regular screwdriver, but is very similar. The torque screwdriver can be used to tighten and loosen screw connections, but its primary function is to tighten torque connections to a specific value. A torque screwdriver will have adjustable torque settings in increments of 1, 5 or 10 inch-pounds with a range between 5 and 150 inch-pounds. A torque screwdriver is used in a straightforward motion by twisting the handle. A torque-limiting clutch is built in, so that the screwdriver will disengage when the preset torque has been reached.

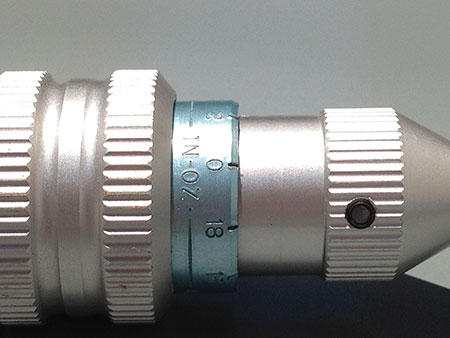
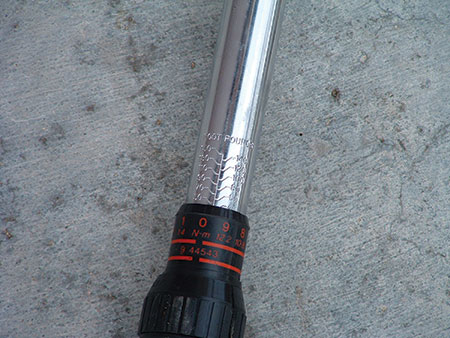
Unlike the torque screwdriver, the torque wrench uses a lever action. The levered action of a torque wrench provides an easier way to apply a higher torque value. Users should be aware that there are usually two torque values given on each side of the torque wrench handle. On one side of the handle, the values are given in newton-meters and on the other side of the handle the values are given in inch-pounds or foot-pounds. (Both can be hard to read because they are etched into shiny metal. See photo 6.) Be sure you are looking at the right values before you start, or you may be applying a higher torque than what is called out, thereby causing damage to the equipment. The lines next to the torque value are not always straight across and can be misread. Applying excessive torque can also strip out the lug. Always double check the values specified by the manufacturer of the equipment and the adjusted values on the torquing device.
What torque value do I use?
Always use the torque value provided by the manufacturer, when available. Newer equipment will always have the torque values provided, but you may have to hunt for them at times. Torque values for terminals within the enclosure can be found on labels on the inside of the cover, the dead front or elsewhere in the enclosure. These terminals include the SEC (service-entrance conductor) lugs, ground/neutral bar, busing connections, lug attachment and bolt-in breakers.
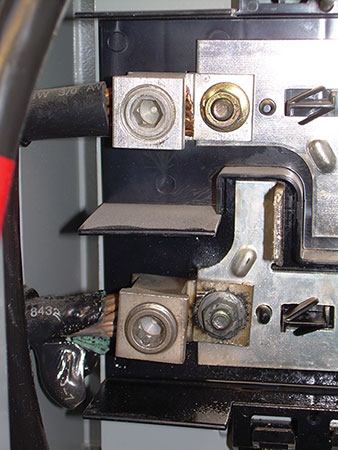
Torque values for circuit breakers are not found on the equipment label. These values will be on the breaker, not on the enclosure. See photo 4. I can’t tell you how many times I’ve seen the electrician looking for this information (unsuccessfully) on the inside of the enclosure in which the breaker is being installed. This information can be found in different locations depending on the manufacturer. For example, the Square D breakers will have the torque values embossed on the side of the breaker whereas Murray breakers will have the information printed on the face of the breaker.
One of the downsides to having the information on the side of the breaker is that you may have to remove the breaker to read the values. Or maybe the electrician has a spare breaker on the truck that will allow you to verify the values without removing the installed breaker. You may also need to bring a magnifying glass or someone with young eyes when looking for the torque values on breakers. This information can be very difficult to read due to the very small font size used.
Where there is no torque value available — which is often the case for older equipment and breakers — default torque values can be found in the 2008 National Electrical Code Handbook (after section 110.14). In the 2011 NEC and newer codes,3, 4 they can be found in Annex I. These values should never be substituted for the manufacturer’s instructions. I cannot stress enough the value of always following the manufacturer’s instructions since the equipment may be listed using a different torque value than the default.
How can the inspector implement verification of proper torque?
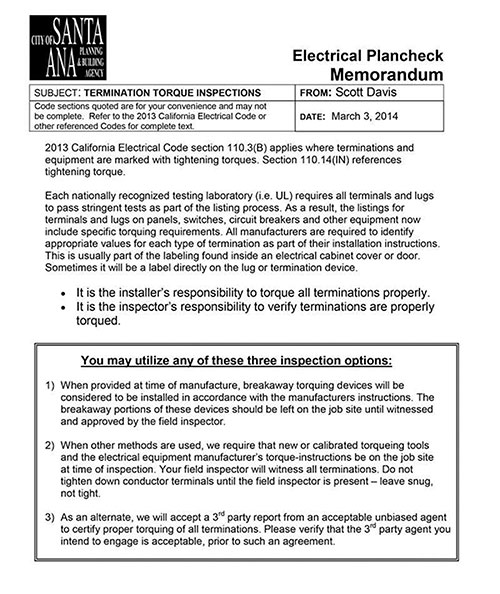
If an inspector questions what authority he or she has to implement verification of proper torque, the Code is there to back you up. Section 110.3(B) in the National Electrical Code requires that equipment be installed according to its listing and labeling. This requirement includes verifying the given torque setting. Not only do we have the authority, but it is also our obligation as inspectors to ensure life safety. An example of a torque inspection policy from Santa Ana, California is included in Exhibit 1.
Before you start implementing this in your jurisdiction, make sure that you have the support of the Building Official. When the Building Official authorizes you to move forward, you become the educator for the electricians and general contractors. While some electricians are very knowledgeable and are accustomed to using torque tools, you can’t assume that every electrician owns the proper tools or knows how to use them. You may need to tell them what tools they will need and where they can purchase them. They may need direction in locating the torque values, and you may need to help them to read the torque values on their torque tools.
Which connections should be torqued?
All field connections must be tightened using appropriate torque tools. The connections that should be torqued in the field normally consist of bolts, connectors and terminals including the following items:
- Breakers
- Neutral/ground bars
- Mechanical, insulated, piercing lug
- Bolts on compression-type connectors
- Mechanical lug & Lay-in lugs
- MSB bussing, bolt-in breakers
Although factory connections in equipment should be tightened to the proper value when they arrive at the job site, there may be indications of loosened connections apparent to the inspector. If loose connections are detected, they may need to be retightened to an appropriate torque value.
Before you torque…
All tools should be calibrated to allow for an accurate torque value. New torque devices come fully calibrated and will stay calibrated for a year. Each year thereafter, recognized companies must calibrate the equipment and apply a sticker showing the date the calibration was done.
The manufacturer may also require an oxide inhibitor/antioxidant for field-installed wiring. Always check the manufacturer’s installation instructions.
Proper torquing methods
Circuit breakers installed within 200-amp service equipment and panelboards may have a variety of setscrews. Not all will require a square tip #2 and not all will have a slotted setscrew. You may use a straight slotted bit for both, but if you have the option to use a square tip bit, you might want to consider using it. The square tip bit will seat better in the setscrew and will be less likely to slip off or jump out of the indentations of the setscrew. When torquing a standard slotted setscrew, you must be sure to apply enough pressure into the termination while applying the torque required to reach the accurate value. This process is not always an easy task, and you will find you may have difficulty keeping the bit to stay in the slot of the slotted setscrew. If the bit is not exactly in the middle of the setscrew, you will not always be able to attain the desired torque value before stripping your connection.
When preparing to torque a mechanical lug with a hex setscrew, you must remember that if your bit is not completely seated into the connection you will round out the connection, potentially making it impossible to reach the manufacturer’s specified torque value. You will either need to require that the electrician replace the entire mechanical lug or find a replacement setscrew to complete the task. If a hex setscrew connection is part of a breaker, the entire breaker may need to be replaced if replacement parts cannot be found. Damaging a breaker with this type of connection is usually a costly mistake, and may cause a time delay that could have been easily prevented if only the hex bit had been completely seated into the setscrew. The key here is to not rush the electrician when he or she is preparing to torque connections.
Oftentimes an extension is needed. When you have a lug that is set back deep into the enclosure, you will need to extend the bit by using an extension. If you do not use an extension, you will find that you will not have full range for your torque wrench or it will cause your bit to not fully seat into the connection again, causing the setscrew to round out damaging the equipment. Always use an extension when needed.
The importance of how to hold a torque wrench may never have occurred to you. You should never use only one hand since that could throw off the center of force, causing a misread or damaging the equipment. One hand should be placed on the handle and the head of the device should be cupped in your other hand providing stability. Pay close attention to the proper technique for using the tools.
Are all torque wrenches the same?
When the electrician is required to provide the torque tools for the inspection, chances are this could be the first time he or she is using the tools. You, the inspector, must pay close attention to the type of torque wrench being used.5 You must know if the device you are using is a foot-pound torque wrench or an inch-pound torque wrench and adjust the values accordingly. If a foot-pound wrench is being used where an inch-pound value is given, no problem. All you need is the ability to do a little simple math to convert inch-pounds to foot-pounds. Divide the number given in inch-pounds by 12, since there are 12 inches in a foot. Now you have the value in foot-pounds. For example, the torque value given for the main lugs and neutral lug on a 200-amp panelboard is 250 inch-pounds. [ 250/12=20.8 ft-lbs.] Remember that there are usually two different values given on the side of the torque wrench, Newton-meters and foot- or inch-pounds; be sure you are reading the correct side or your values will be wrong.
Torque screwdrivers of different capabilities can look identical but be very different. Once while doing an inspection while the electrician was using a torque screwdriver, I knew something was not quite right by the sound the torque screwdriver made when it reached the set torque. The sound was very faint compared to others I had encountered. After investigating, I discovered the torque screwdriver being used was measured in inch-ounces. There are identical looking torque screwdrivers that have increments given in inch-ounces and inch-pounds. See photo 2. The in-ounces torque screwdrivers will not work for values given in the electrical equipment that you are inspecting — an in-pounds torque screwdriver must be used.
Each brand of torque wrench will make a different sound when reaching the specified torque value. A big difference between the torque screwdriver and the torque wrench when reaching the specified torque value is that a screwdriver will disengage, whereas a torque wrench will continue to tighten if you do not feel or hear the click it makes. If you are not familiar with the sound the torque wrench makes, I suggest lowering the torque value by 25% and torque the termination to verify what the click sounds like; then turn it back up to the specified torque and tighten the rest of the way. Some are so quiet that you practically need to put your ear next to the wrench to hear it click. Sometimes the setscrew will make a sound when turning, making you think that it is the torque wrench clicking as it reaches the correct torque value. It is important that you know the difference.
Best Practices
- When verifying connections are not under-tightened, a value that is 10% less is a good rule of thumb to be sure that you do not overtighten the connections. Ten percent below the torque specifications, especially on old equipment, is a good place to start.
- The specified torque value should never be exceeded. The theory of “more torque is better” is just not true. Applying a higher torque value than is specified may cause damage to the connection or equipment.
- Torquing should never be performed on energized equipment; if it must be done, ensure that proper PPE is utilized.
- Prior to energizing the service, the electrician should demonstrate that he or she has properly torqued terminations.
- Loose electrical connections are one of the leading causes for electrical failures.
- Tools are used to precisely apply a specific torque to a fastener.
Necessary tools for making electrical connections:
- Screw driver (for opening the de-energized equipment)
- Wire brush
- Oxide inhibitor
- Default torque values
- Channellocks (to secure lugs)
- Torque wrench (inch-pound and foot-pound)
- Torque screwdriver
- Bits-standard/slot and hex; including extra deep bits
- Socket set (for bolt connections)
Summary
Sure, torquing takes additional time to verify, but it is worth the extra time to do a complete inspection. If we do not verify torqued connections properly, have we done all we can do to verify a safe installation? According to NEC 90.1, “The purpose of this Code is the practical safeguarding of persons and property from hazards arising from the use of electricity.” Properly torqued connections increase the safety and reliability of electrical installations.
According to BURNDY, an electrical connector manufacturer,
“The use of mechanical connections for electrical service to residential and commercial customers is common practice. However, the installation of mechanical wire connectors requires the application of the manufacturer’s recommended torque. The use of a calibrated torque wrench, torque screwdriver, or other device for measuring applied torque is the only way to ensure that the manufacturer’s torque is achieved. Each year there are failures in electrical connections due to misapplied torque as per the connector manufacturer’s recommendation. This is not due to poor workmanship; it is rather a lack of understanding of the physical connection between the conductor and the connector. Without using the proper tools, it has been shown that even experienced electricians cannot consistently tighten the connector to the recommended torque value. For electrical connections the old adage ‘hand tight plus a quarter turn’ is not sufficient to produce a proper mechanical connection. The mechanical interface between the connector and the conductor is an integral part of a safe and reliable electrical connection. The mechanical connection applies a force on the conductor which creates a greater area of contact. The manufacturer of mechanical connectors designs and tests the connectors to establish the correct amount of pressure (torque) to apply to meet the requirements of mechanical reliability and current flow.”
References:
1http://www.mt-online.com/february1998/the-loose-electrical-connection-myth
2http://iaeimagazine.org/magazine/2010/07/16/the-difference-between-success-and-failure-how-a-torque-wrench-improves-system-reliability/
3http://iaeimagazine.org/magazine/2011/07/16/are-you-the-weakest-link/
4http://www.ecmag.com/section/codes-standards/dont-be-uptight
5http://ecmweb.com/content/torque-wrenches-critical-tools-critical-connections
Rhonda Parkhurst wishes to thank Christel Hunter for her excellent editorial input.